Introduction
The Factory Method pattern is the foundation of software architecture, providing an adaptable answer to the challenge of producing objects without defining their exact classes. Subclasses can modify the kind of objects that are generated thanks to this pattern, which encapsulates the object generation process. We will examine the fundamental ideas, advantages, and use of the Factory Method pattern in this blog article, along with some sample code for clarity.
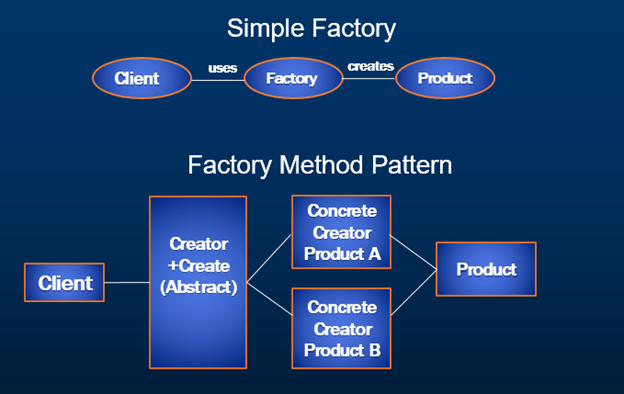
What is the Factory Method Design Pattern?
The Factory Method pattern is categorized under the creational design patterns, which deal with object creation mechanisms. At its core, this pattern defines an interface for creating objects but allows subclasses to alter the type of objects that will be instantiated.
Key Components of the Factory Method Pattern
- Product : This represents the objects created by the factory method.
- Creator : The superclass that declares the factory method for creating objects.
- Concrete Product : Subclasses that implement the Product interface.
- Concrete Creator : Subclasses that override the factory method to produce objects of a particular subclass.
Benefits of Using the Factory Method Pattern
- Encapsulation : Object creation logic is encapsulated within the factory method, promoting loose coupling between the client code and the created objects.
- Flexibility : The pattern allows for easy extension by introducing new product types without modifying existing client code.
- Abstraction : Clients work with interfaces rather than concrete implementations, enhancing code maintainability and scalability.
Example
Scenario
Let’s consider a scenario where we have a Vehicle interface representing different types of vehicles, and we want to create instances of Car and Motorcycle classes using the Factory Method pattern. We’ll focus on creating different types of vehicles: cars and motorcycles. Each vehicle will have its own characteristics and functionalities.
Code implementation in Java
Define the Blueprint: Vehicle Interface
First, we need a blueprint for our vehicles. Think of this as a set of instructions that every vehicle must follow.
interface Vehicle {
    void drive();
}
Build the Cars and Motorcycles
Now, let’s create our concrete vehicle types: cars and motorcycles. Each type will implement the Vehicle interface and define its unique driving behavior.
class Car implements Vehicle {
    @Override
    public void drive() {
        System.out.println("Driving a car...");
    }
}

class Motorcycle implements Vehicle {
    @Override
    public void drive() {
        System.out.println("Riding a motorcycle...");
    }
}
Setting Up the Factory
In our dealership analogy, the factory represents the mechanism responsible for creating vehicles. We’ll create a factory class for each type of vehicle: CarFactory and MotorcycleFactory.
abstract class VehicleFactory {
    abstract Vehicle createVehicle();
}

class CarFactory extends VehicleFactory {
    @Override
    Vehicle createVehicle() {
        return new Car();
    }
}

class MotorcycleFactory extends VehicleFactory {
    @Override
    Vehicle createVehicle() {
        return new Motorcycle();
    }
}
Let’s Hit the Road: Client Code
Now, it’s time for the client, representing the customer at the dealership, to choose and drive their desired vehicle.
public class Main {
    public static void main(String[] args) {
        VehicleFactory carFactory = new CarFactory();
        Vehicle car = carFactory.createVehicle();
        car.drive();

        VehicleFactory motorcycleFactory = new MotorcycleFactory();
        Vehicle motorcycle = motorcycleFactory.createVehicle();
        motorcycle.drive();
    }
}
Conclusion
This pattern encourages flexibility and scalability in software architecture by enclosing the creation logic into subclasses, much like an automaker does to efficiently provide a range of automobiles to its clients.